RSS

Saturday, November 26, 2011

Crafturday Creative Mess 14 - Silk Yarn bangles


Some of the hottest accessories on the market this season are bangle bracelets wrapped with yarn or thread in bright, shiny, punch-colored hues and subdued earthy tones bursting with texture. The good news is that these coveted bangles are super-easy to make, and the process is super-creative. All you need to do is pick out some fun ribbon, trim, yarn, or embroidery thread, choose a design, and then wrap away.
You can keep it simply chic with one material in a solid color, or get creative with bold combinations and using various twisting, knotting, and wrapping methods.
Once you've got your design picked out, it's time to wrap your fabric around the bangle.
1.Start with glue on a bare bangle. It will hold the yarn in place so you don't have to.
2.It's bangle wrapping time
3.At the end, add a few drops of glue to the bangle. Hold the last wrap in the glue for a few seconds to secure it.
Now you have beautiful bangles to show off.
I hope you enjoyed this tutorial!
Linking this post HERE
You can show off your awesome and inspirational projects, crafts, recipes, and anything that you’d like to {spotlight} from your blog every week at CCM linky party!

If you are participating in Crafturday Creative Mess  then please put your PERMALINK into the “url” box for inlinkz – and link back to my blog so everyone gets to know about CCM linky party. The “Crafturday creative mess” linky party is open for the whole WEEK......
If you'd like to include the CCM button in your post, grab the html code from underneath the CCM logo on the side bar to the right.
To receive the latest posts, as well as updates, have CHITRASUTRA  delivered right to your Inbox.  You'll find a link to subscribe via Email on the sidebar to the right.  Thanks for reading.... so glad you are here!
Note: Images that are not watermarked are collected from various sources on web.


Saturday, November 19, 2011

C.C.M 13 - How I crammed my life in a jar.....

Memories, no matter how important or seemingly ordinary, are like fingerprints on our soul. Unique to each individual as the whorls and ridges on the edges of our fingertips. A Memory Jar is a jar  which contains a number of memories that you share with someone special in your life. You determine the number of memories and the manner in which they are presented. Keep it simple or make it as elaborate as your time and budget permit.
Create a memory jar for anyone who is important in your life or create it for yourself. It can be a spouse, child, parent or other relative. Your best friend. A favorite teacher. A boss. Anyone who has helped to shape your life and your memories.
I used a glass storage jar with a screw on lid. I used these jars to store scented dry flowers given to me by my sister and sea shells that I collected from my recent visit to the beach. I closed the jar using tissue paper and gold cord.
As the jar was rather plain, I purchased a beautiful, shimmery scarf. I spread the scarf out on a table and placed the jar in the center. I then gathered the scarf up around the jar and secured it at the neck with a rubber band. When I was satisfied with the final effect , I used a gold cord with tassels to tie the scarf securely to the jar and to disguise the rubber band.
There are so many things you can do with the old jars..........
Simply pop some pretty black and white photos into old jars for a nice mantle display like this one from Yankee Magazine.
Martha Stewart shows "vacation memory jarshere.  See one photo below.

I hope you enjoyed this tutorial! 
Linking it here


You can show off your awesome and inspirational projects, crafts, recipes, and anything that you’d like to {spotlight} from your blog every week at CCM linky party!

If you are participating in Crafturday Creative Mess  then please put your PERMALINK into the “url” box for inlinkz – and link back to my blog so everyone gets to know about CCM linky party. The “Crafturday creative mess” linky party is open from Saturday  through Tuesday every week......
If you'd like to include the CCM button in your post, grab the html code from underneath the CCM logo on the side bar to the right.
To receive the latest posts, as well as updates, have CHITRASUTRA  delivered right to your Inbox.  You'll find a link to subscribe via Email on the sidebar to the right.  Thanks for reading.... so glad you are here!
Note: Images that are not watermarked are collected from various sources on web. 


Saturday, November 12, 2011

C.C.M 12 - Dream Catcher

Native Americans believe that the night air is filled with dreams both good and bad. The dream catcher when hung over or near your bed swinging freely in the air, catches the dreams as they flow by. The good dreams know how to pass through the dream catcher, slipping through the hole in the center and slide down the soft feathers so gently that many times the sleeper does not know that he/she is dreaming. The bad dreams not knowing the way get tangled in the dream catcher and perish with the first light of the new day. The dream catcher has been a part of Native American culture for generations.
Supplies you will need:
  • A ring- I used a metal ring about 3 inches in diameter
  • Suede like lacing to wrap the metal ring
  • Some thick strong thread
  • Some beads and feathers or other embellishments you might like to use.
Let’s get started...!! Glue one end of suede like lacing to the ring you are using.  Wrap the lacing around the ring until you have covered the whole thing. Glue the end of the lacing to the ring.


To make the hitch knot, you place the string loosely over the top of the ring and then bring the end up through the hole that you’ve made as per the diagram below.
Repeat this evenly around the ring, about 8 times.
You continue with the hitch knot for each additional round that you make around the ring. With rounds 2 and beyond, instead of making the hitch knot around the ring, you will be making it around the center of each stitch from the previous round.
When you get near the end, make a stitch twice in the same spot and tie the string off.

Use additional lacing (or string if you prefer) to create a hanger at the top of your dreamcatcher. You may want to adorn your dream catcher  with beads and/or feathers. I used a pegion feather and few barbs from a peacock feather.  There you are with a beautiful dream catcher!!
People believe that the dream catcher should be hung in the room in which we sleep: above the bed, on the door, on a window, or as we choose.
I hope you enjoyed this tutorial!
Linking it HERE
You can show off your awesome and inspirational projects, crafts, recipes, and anything that you’d like to {spotlight} from your blog every week at CCM linky party!
If you are participating in Crafturday Creative Mess  then please put your PERMALINK into the “url” box for inlinkz – and link back to my blog so everyone gets to know about CCM linky party. The “Crafturday creative mess” linky party is open from Saturday  through Tuesday every week......
If you'd like to include the CCM button in your post, grab the html code from underneath the CCM logo on the side bar to the right.
To receive the latest posts, as well as updates, have CHITRASUTRA  delivered right to your Inbox.  You'll find a link to subscribe via Email on the sidebar to the right.  Thanks for reading.... so glad you are here!
Note: Images that are not watermarked are collected from various sources on web.


Saturday, November 5, 2011

Crafturday Creative Mess 11 - Thank you cards

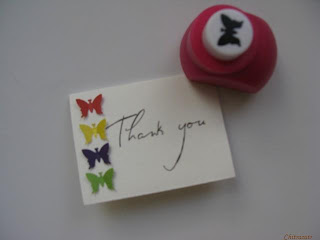
 It has taken me a while to write and send out thank you cards for the gifts we’ve received for Diwali. To me, writing a thank you card is serious business. I really want each one to be heart felt, and to let the giver know how meaningful their gift truly is to me. Each card has unique thoughts, and because of this I usually only complete 1 or 2 cards once I finally sit down to write.

It is more interesting for me to use different cards, instead of the same ones each time (even though I know they are going out to different people). That is where my new Butterfly craft punch comes in. I’ve had these cheap, plain cards hanging around for a while. All it took was a few pieces of scrap paper and voila! a new look to otherwise plain cards. You can also give a new look to generic thank you cards, if there are any lying at home. My thank you cards were made of butterflies all lined up and punched from many different colors of paper.

Also, if you haven’t already seen them, butterfly collages are a really fun way to use this punch, too.


You can show off your awesome and inspirational projects, crafts, recipes, and anything that you’d like to {spotlight} from your blog every week at CCM linky party! The “Crafturday creative mess” linky party is open from Saturday  through Tuesday every week......
If you are participating in Crafturday Creative Mess  then please put your PERMALINK into the “url” box for inlinkz – and link back to my blog so everyone gets to know about CCM linky party.

If you'd like to include the CCM button in your post, grab the html code from underneath the CCM logo on the side bar to the right.

To receive the latest posts, as well as updates, have CHITRASUTRA  delivered right to your Inbox.  You'll find a link to subscribe via Email on the sidebar to the right.  Thanks for reading.... so glad you are here!


Note: Images that are not watermarked are collected from various sources on web.


Friday, November 4, 2011

Turning C.C.M into a Linky Party

Hello every one..... I decided to convert Crafturday Creative Mess into a linky party. 
Show off your awesome and inspirational projects, crafts, recipes, and anything that you’d like to {spotlight} from your blog every week! Every Saturday Crafturday Creative Mess linky party is gonna be more fun with others participating…Please visit & comment on other projects/blogs. We all love comments…let’s share the LOVE!
The Crafturday Creative Mess Linky Party is open from Saturday  through Tuesday every week......

If you are participating in Crafturday Creative Mess  then please put the Permalink of your post into the “url” box for inlinkz – and link back to my blog so everyone gets to know about CCM linky party.

If you'd like to include the CCM button in your post, grab the html code from underneath the CCM logo on the side bar to the right.
To receive the latest posts, as well as updates, subscribe via an RSS Reader or have CHITRASUTRA  delivered right to your Inbox.  You'll find links to subscribe via RSS and Email on the sidebar to the right.  Thanks for reading.... so glad you are here!
I am so so so excited for tommorrow...!!